Monday 29 December 2014

Simplest GIF Glitter Animation in Photoshop

Creating glitter animation is very simple and requires very few steps if you have got the glitter brush. If you don't have one, click on this link to learn to create your own glitter brush.

  • At first open the image to be edited in photoshop by File->Open or simply by dragging the image into photoshop.

  • Now Go to windows->Animation. 

  • Now you will find a Timeline at the Bottom. Create a new layer (Shift+Ctrl+N) , select the brush tool and choose the color= White(Its your wish). Create spots here and there with brush tool (You can adjust the brush size by using the keys [ and ] ).
  • Make sure you are selecting the glitter brush you have got or create one by following this link.

  • Click on the icon at the top corner of the timeline and Choose new frame as shown below.

  • Again click on the same icon and select Tween.

  • You can add as many number of frames you want. Here I have made it 8 and Hit OK.

  • Now Select the second frame, create new layer(Shift+Ctrl+N), Hide the old layer and draw on the image with the brush.


  •  Now Repeat the same process. Select the succeeding frame (here 3rd frame), create new layer(Ctrl+Shift+N),hide the other two layers and create brush spots. You can change the color of the brush by clicking on the foreground color and choose any color as you wish for different frames.

  • Do repeat the same process for all the frames you have got by creating new layer for each as shown earlier.

  • If required you can set the time delay by clicking at the drop down button at the bottom. Here iI have set it to 0.2 seconds.

  • Go to File->Save for Web&Devices.

  • Choose GIF and Looping Option= Forever.

  • Save it in any name of your wish and open it in the browser to view the animation.

  • Here is the Final look of the Created Glitter Animation.

  • In the same image you can write your greetings for anyone and make amazing greeting cards. Here is the one i have done it...

Create your own Glitter or Sparkle Brush in Photoshop

Learning to create your own glitter brush helps in many other photoshop works like twinkle effect.
So here are the steps to be followed:
  • Open a new file. Here i have chosen the size as width=2500, height=2000 and background color = black.

  • Now open brush tool. Set the size=15px; Hardness=0%

  • Now create new layer by clicking on the icon the right side corner and open Pen tool.

  • Draw a path by marking two anchor points at top and bottom.

  • Now right click on the image and select stroke path

  • Check Simulate Pressure and Hit ok.

  • Now Hide the path by clicking Ctrl+H. Then duplicate the layer by pressing Ctrl+J. Then Open edit->Transform->Rotate 180.
  • Now duplicate the layer again by pressing Ctrl+J. Go to Edit->Free Transform. 

  • Turn it to a diagonal shape and shrink its size as shown below.

  • Duplicate the layer again. Go to Edit->Transform and select Flip Horizontal.

  • Now you can move the entire star image if u you want by selecting all the 4 layers holding shift and  then using the arrow keys.

  • Create new layer(Shift+Ctrl+L). Select Brush Tool and choose the foreground color = White.

  • In that layer, by adjusting the size of the brush using the keys [ and ] , click at the centre of the star twice with different sized brush.

  • Create a new layer( Shift+Ctrl+L), Choose the foreground color = Black, select the Fill Tool and click on the image. You will find it to be entirely black like the one below.

  • Go to Filter->Render->Lens Flare.

  • Adjust the brightness as per your wish. Here i have given Brightness = 117% and checked Lens Type = 50-300mm

  • Click on the blending mode and choose Screen.

  • You can resize the lensflare using the transform tool.


  •  Select all the layers holding Shift key and press Ctrl+E or choose Merge Layers by right click on the selection.

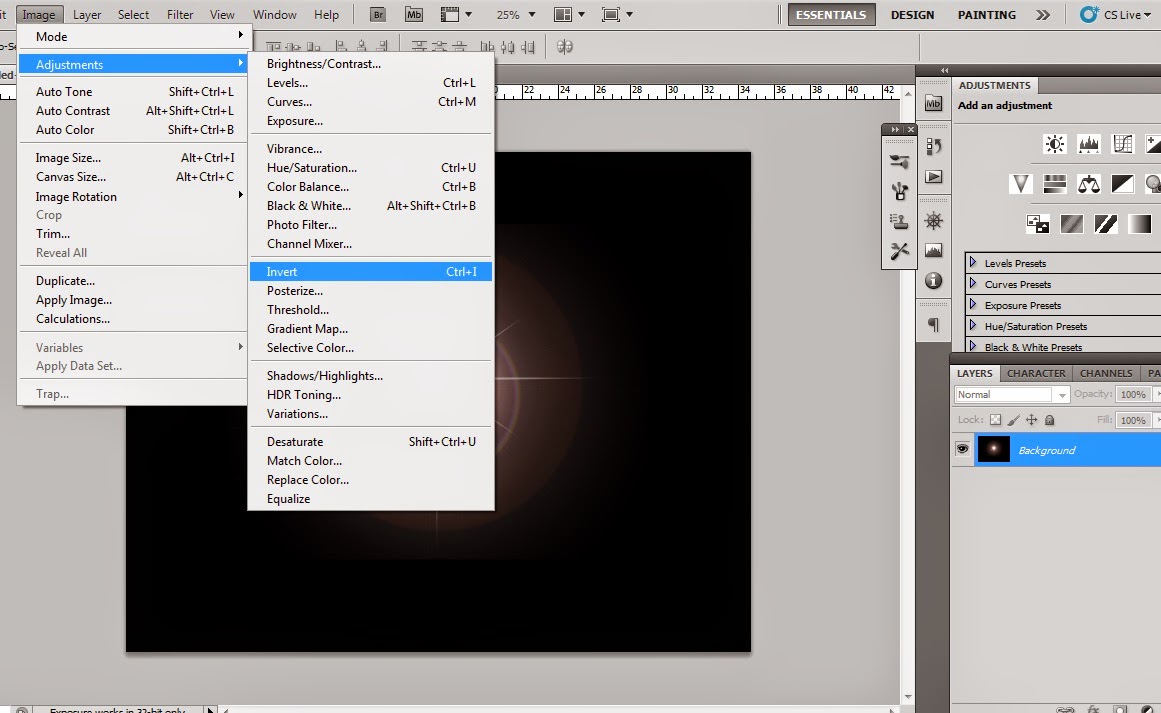
  • Go to Image->Adjustments->Invert.

  • Go to Edit->Define Brush Preset.

  • Give a name you want to the sparkle brush you created and hit OK.

  • Now the new brush style will get stored and you can select it from the brush preset.

  • Here is a sample Painted using the newly created sparkle. You can change the color of the brush and paint it with varying sizes.

Monday 22 December 2014

Changing summer photos to winter in Photoshop

This tutorial is about changing a photo taken in summer period to a misty winter season.

  • At first Open the image to be edited by File->Open or just by dragging the pic to photoshop. Here is the photo taken during summer that iam going to edit.
  • Go to Image->Adjustments-> Select Desaturate.
This is how the image looks like now
  • Go to Select->Color Range
  • Now using the Eye Dropper Tool click on the color you see in the image. The areas selected will be shown as white and the other regions in black.  
  • To add more areas to the selection, select the eyedropper + tool shown below and click on the other regions to be selected. Here i have set the fuzziness = 100 but it may vary for other images. Adjusting the right amount of fuzziness gives more realistic look.
  • Now you will see all those areas are being selected.
  • Now Create New Layer by clicking on the second icon from right.
  • Now Go to Edit->Fill
  • In the dialog box that opens, Select white and hit ok
  • Now you will get a white image. If you feel its too much then reduce the opacity depending on how much snow is needed.
  • Here iam going to reduce the opacity to 70% as shown below.
  • From the adjustment layer below, select photo filter.
  • Choose Cooling filter from the drop down and adjust the density bar to match your image. 
  • This is how my image looks like after applying the cooling filter. 
  • You can finish off with this step if you want just snow but if you need snow fall effect over it then proceed with the steps given below.
  • Select Brush tool or simply press B and choose any brush size. you can vary the size using [ or ].
  • Now open Brush presets and select the shape dynamics. Make the changes as shown below.
  • Now select scattering and do the following changes. This is all done to scatter the brush size so as to give a realistic look like snow fall.
  • Now create new layer and rename it as background snow. Keep the brush size very small paint and click all over the image randomly. This layer is for the snowfall thats far behind.
  • Now create another layer and say it to be snow inbetween. Again mark dots on the image here and there by increasing the brush size by pressing ].

  • Create a final layer for the snow thats falling big and closeby. lets call foreground snow by renaming the layer. Increase the brush size much more and click here and there in the image as shown below.
  • Now select the background snow layer and go to Filter->Blur->Gaussian Blur and set the radius and hit ok. Here i have set it to 5..
  • Now Select the snow inbetween layer. Go to Filter->Blur>Motion Blur. Change the Angle and distance to set the direction of snow fall. Here i have set angle=-41 and distance =53 pixels.
  • Now adjust the opacity of this layer to make it look realistic.
  • Now repeat the same procedure with the foreground snow layer also. Adjust Motion blur and opacity.
  • This is how the final output looks like. This is a image showcasing mild winter.
  • The same image with intense winter look using the same method but different adjustments.